

How to Properly Isolate Lashes for Extensions: The Pro Artist’s Guide to Flawless Sets
What if your slow application speed isn't a lack of talent, but a failure to master the one high-stakes foundation that separates the $1.33 billion global market leaders from the struggling hobbyists? You know the feeling. The hand fatigue is real. Your client is twitching. You are fighting for your life to find one natural lash in a sea of fluff. Stickies are the ultimate vibe killer that trash your retention and your reputation. Learning how to properly isolate lashes for extensions is the surgical difference between a clumpy set and a professional masterpiece.
At LivBay Lash Supplies, we are obsessed with technical mastery that fuels a lifestyle of success. This isn't just about applying lashes; it is about protecting lash health and boosting your income for 2026. This guide promises to transform your technique, helping you eliminate stickies and master the high-stakes art of separation. We are diving into the ergonomic secrets, elite tool kits, and pro layering methods that will keep your lash besties coming back for more. It is time to level up.
Key Takeaways
- Protect your client’s natural lash health and stop premature shedding by mastering the high-stakes science of the lash growth cycle.
- End the hand fatigue nightmare by choosing the exact tweezer angle, from crane to curved, that fits your unique artistry style.
- Master how to properly isolate lashes for extensions using the Tape-Back and Layering methods to expose every hidden lash layer for a dense, full look.
- Boost your application speed and precision with the Anchor Method, ensuring every set is 100% sticky-free and flawless.
- Stop the self-taught struggle and invest in technical mastery that transforms your craft into a high-end, high-income lash lifestyle.
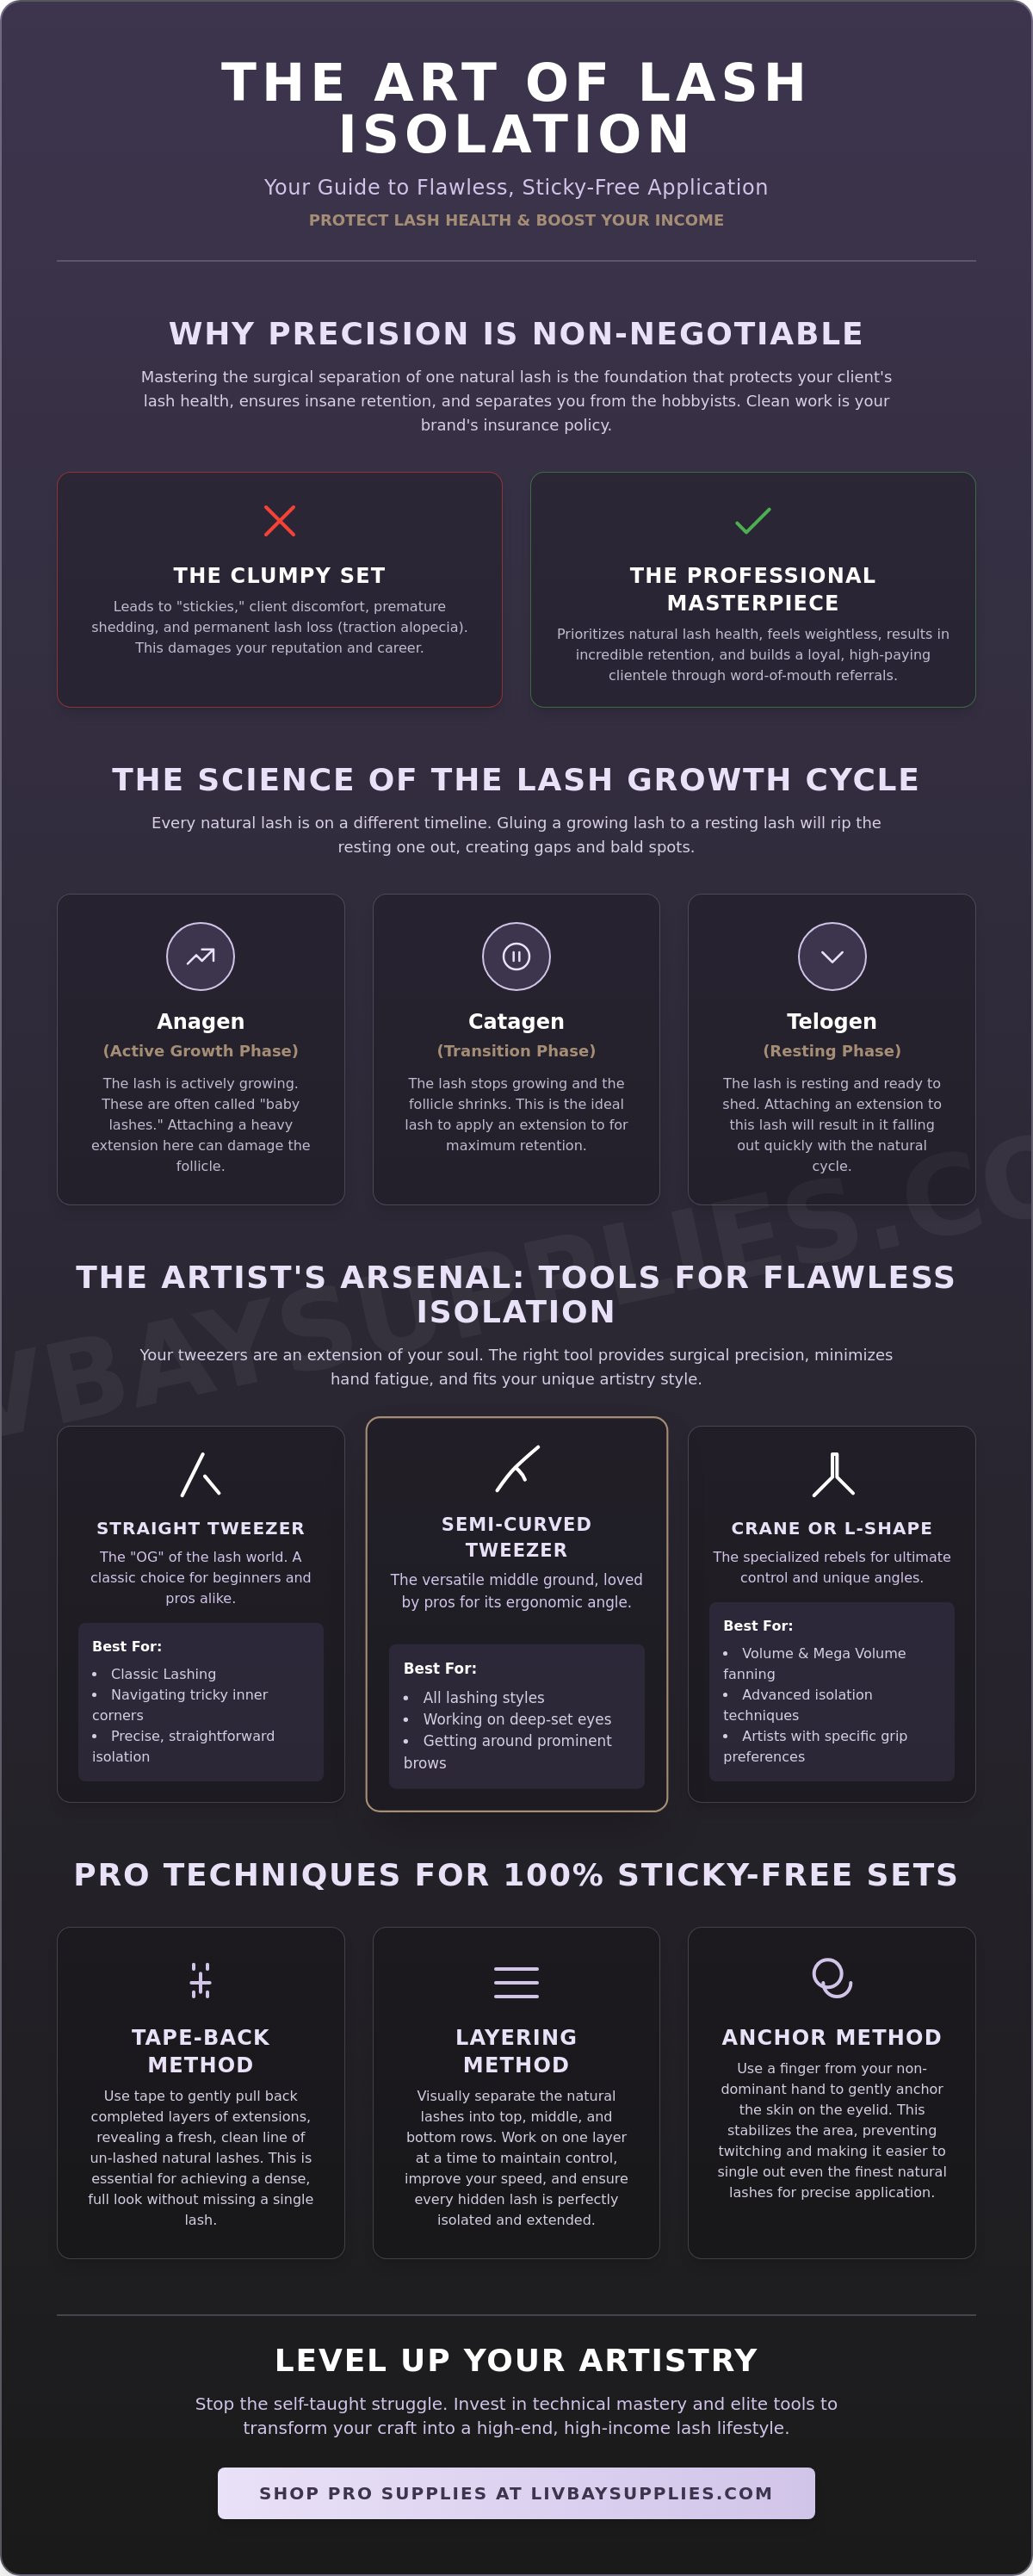
The High-Stakes of Lash Isolation: Why Precision is Non-Negotiable
Isolation is the absolute heartbeat of your set. It is the surgical process of separating one single natural lash from its neighbors. If you don't master this, you aren't a lash artist; you're just a person with glue and a dream. If you want to know how to properly isolate lashes for extensions like a pro, you have to understand the science behind the hair. When applying eyelash extensions, precision is your only protection against a client disaster. Every natural lash is on its own timeline. You have the Anagen (active growth), Catagen (transition), and Telogen (resting) phases happening all at once across the lid. If you glue a growing Anagen lash to a resting Telogen lash, that growing hair is going to literally rip the other one out by the root. That is how you end up with gaps, bald spots, and a client who never comes back.
Learning how to properly isolate lashes for extensions is the number one factor in achieving insane retention. You can have the best adhesive on the planet, but if your isolation is trash, your sets will look messy and feel even worse. Precision is non-negotiable if you want to play in the big leagues. Your reputation is built on the health of the natural lash, not just the drama of the set.
The Anatomy of a Sticky: What Happens When You Fail
A "stickie" is exactly what it sounds like. It's a technical failure where two or more lashes get bonded together. Maybe it's a tiny baby lash getting caught in your extension, or maybe two extensions are hugging each other. Either way, it's a nightmare. Your client will feel a constant, annoying tugging sensation every time they blink. This isn't just about comfort; it's about safety. Constant tension on the follicle leads to traction alopecia. This is permanent lash loss. If you destroy their natural lash line, you destroy your career. Clean work is the only way to keep those follicles healthy and thriving for years to come.
Isolation as Your Brand’s Insurance Policy
Think of isolation as your business insurance. Top 1% lash artists don't just "apply lashes." They protect lash health with religious intensity. With 62% of women aged 18-34 using false lashes regularly as of 2026, the competition is fierce. You stand out by being the artist who prioritizes health over shortcuts. When your work is clean, your clients notice. They don't feel the extensions; they just see the magic. This leads to high-velocity word-of-mouth referrals and the ability to charge premium prices. In a market projected to reach USD 2.09 billion by 2035, you cannot afford to be the "clumpy" artist. Moving from a mindset of speed to a mindset of health is how you level up. It is the ultimate flex to show a set with zero stickies and perfect separation. That is the LivBay way.
The Artist’s Arsenal: Tools for Flawless Isolation
Your tweezers are an extension of your professional soul. If you are struggling with how to properly isolate lashes for extensions, the issue usually isn't your talent; it's the metal in your hand. One size fits all is a total lie in the lash world. Your hand shape, grip strength, and the client’s unique eye anatomy all dictate what tool you need to win. Investing in elite gear from LivBay Lash Supplies is the first step to building a high-retention empire. You need tools that offer a surgical level of precision without forcing you into a death grip that kills your speed.
Let’s talk about that 2-hour mega volume set. By the 90-minute mark, your hand shouldn't be screaming. Tweezer tension is the silent killer of lash careers. You want a tool with a "sweet spot" that requires minimal pressure to close. High-quality isolation tweezers allow for micro-movements without the repetitive strain that leads to sloppy work. Following FDA safety guidelines for eyelash extensions means using precision-engineered tools that perform under the high-pressure environment of a busy salon. When you have the right tension, you can isolate for hours and still feel fresh for your next "lash bestie."
Selecting Your Isolation Tweezer Style
- The Straight Tweezer: These are the "OG" of the lash world. They are the classic choice for beginners and the absolute best for navigating those tricky inner corners where space is tight.
- The Semi-Curved: This is the versatile middle ground. Many pros are obsessed with the slight angle because it allows you to get around deep-set eyes or prominent brow bones without losing your line of sight.
- The Crane or L-Shape: These are the specialized rebels. They offer a unique ergonomic angle that lets you isolate difficult layers from above, keeping your wrist in a neutral, pain-free position.
The UV Revolution: How Technology Simplifies Isolation
The game changed completely in 2026. UV lash technologies are the ultimate revolution for isolation precision. Why? Because the "stickie window" is officially closed. Traditional adhesive takes a few seconds to grab. In those few seconds, a neighboring lash can jump right into the wet glue. It's a mess. With L.E.D. systems, you isolate, you click, and it is cured instantly. No waiting. No accidental bonds. Just pure, unadulterated speed that lets you move to the next lash immediately. This tech is a total game-changer for artists who want to slash their application time without compromising on quality. Ready to upgrade your kit? Check out the latest isolation tweezers from LivBay Lash Supplies designed for the modern boss artist.
Pro Techniques: Master the Tape-Back and Layering Methods
Ready to stop guessing where those baby lashes are hiding? Mastering how to properly isolate lashes for extensions means moving beyond basic "poke and hope" methods. You need a strategy to navigate the dense forest of a client's natural lash line. The double-handed approach is your first step toward total control. Use your isolation tweezers to clear a path while your pick tweezers hold the window open. This creates a high-visibility zone that makes placement effortless. If you are struggling with inner and outer corners, you aren't alone. These are the high-stakes areas where most artists lose their cool. Tension is higher here, and the skin is thinner. Use your isolation tool to gently anchor the lid, giving you the perfect angle to hit every single lash without poking the client.
Precision isn't just about aesthetics; it's about following FDA safety guidelines for eye cosmetics to avoid irritation or injury. When you manipulate the eyelid to see better, you must be gentle. Professional artistry is about the balance between total visibility and client comfort. If you can't see the base of the lash, you can't isolate it properly. This is where the pros separate themselves from the amateurs. They don't just work on what they see; they hunt for what is hidden.
The Tape-Back Masterclass
The Tape-Back method is a total game-changer for speed and accuracy. It allows you to work through the lash layers systematically rather than jumping around randomly. Follow these steps to master the flip:
- Step 1: Use a small piece of low-tack tape to gently pull the top 50% of the natural lashes back toward the eyelid. Don't pull too hard; you just want to expose the bottom row.
- Step 2: Use your isolation tweezers to pick the bottom layer lashes one by one. Since the top layers are tucked away, your visibility will be 100% better.
- Step 3: Gradually release the tape or use a second piece to isolate the middle layer. Finishing with the top layer ensures zero stickies between rows.
Working in Layers for a Full Set Eyelash Extension
To create a truly dense Full Set Eyelash Extension, you have to master the "Under-Lash" technique. Instead of isolating from the top, try coming in from underneath the lash line. This often provides a clearer view of the lash roots, especially for clients with hooded eyes. Horizontal isolation works best for deep-set eyes, while vertical isolation is your best friend for clients with a prominent brow bone. Learning how to properly isolate lashes for extensions across every layer builds a symmetrical lash map that looks flawless from every angle. This "isolation-first" mindset ensures that your volume fans have the space they need to bloom without crowding the neighbor lashes. It is technical, it is intense, and it is exactly what your clients are paying for.
Speed vs. Precision: How to Isolate Faster Without the Mess
Speed is the ultimate flex in the lash game. If you are taking four hours for a volume set, you aren't just losing time; you're losing money. But let’s be real. Moving fast is useless if your isolation is sloppy. To master how to properly isolate lashes for extensions at a high velocity, you need to turn your technical movements into pure muscle memory. Developing a "search and place" rhythm allows you to flow through the set without overthinking every move. You isolate, you dip, you place. Repeat. It's a hustle, and you have to stay in the zone to keep your application times tight and your income growing.
Lighting and magnification are your best friends here. You literally cannot isolate what you cannot see. If you are squinting, you are slowing down. High-output L.E.D. lamps and professional magnification glasses aren't just accessories; they are essential gear for the top 1% of artists. When every lash is illuminated, your brain processes the information faster, allowing your hands to react with surgical precision. This is how you eliminate the "search" time and get straight to the "place" phase. Clean, bright light is the secret to seeing those tiny baby lashes before they become a sticky nightmare.
Ergonomics for the Long-Haul Artist
Don't wreck your body for a paycheck. Carpal tunnel and repetitive strain are the silent killers of lash careers. Proper wrist alignment is non-negotiable. Your wrist should stay neutral, not flexed or extended. This starts with your environment. A high-quality, ergonomic lash bed and an adjustable stool are mandatory. If you are hunched over, your isolation will suffer. The Anchor Method is the use of a fulcrum point on the client's forehead to stabilize isolation. By resting your pinky finger on the forehead or eye pad, you create a stable base for those tiny, micro-movements. It's the secret to steady hands during a high-stakes mega volume set.
Troubleshooting Difficult Lashes
Every artist has faced the "criss-cross" nightmare. Some natural lashes just refuse to play nice and stay separate. When you hit these troublemakers, don't panic. Use a "guide lash" technique. Isolate and place an extension on a neighboring lash first to act as a physical barrier. This keeps the workspace clear for the difficult lash. Dealing with baby anagen lashes is another hurdle. These tiny hairs love to jump into your adhesive. Use your isolation tweezer to gently push them down or use a tiny piece of tape to hold them out of the way. Learning how to properly isolate lashes for extensions even when the natural lashes are messy is what makes you a pro. Ready to upgrade your speed? Grab the best lash tools for speed and start slashing your set times today.
Level Up Your Artistry: Training and the LivBay Lash Supplies Way
Self-teaching is the fastest way to hit a technical ceiling. You might figure out the basics through trial and error, but you will likely pick up bad habits that destroy your speed and your spirit. Isolation isn't just a random step in the process; it is the bridge between a "meh" set and a legendary one. If you want to know how to properly isolate lashes for extensions at a world-class level, you need professional eyes on your work. As of April 2026, the industry is professionalizing at a record pace. New regulations in Maryland and Utah mean technicians must meet higher training standards to stay licensed. You don't want to be left behind while the rest of the industry is leveling up.
At LivBay Lash Supplies, we don't just sell tools; we sell a lifestyle of technical mastery. Our education focuses on the "no-nonsense" reality of the salon floor. Whether you choose our "Lash with LUV" Online UV Training for $129.00 or drop a $300 deposit to secure your spot in a live, in-person intensive, you are investing in your future. Online training is a total game-changer for convenience. However, nothing beats the immediate, high-energy feedback of a master artist in the room with you. They see the tiny mistakes in your grip or the slight tilt in your wrist that you would never notice on your own. This is how you fix your isolation struggles for good.
Investing in Your Technical Skills
A 3-day intensive class can shave months off your learning curve. Why spend a year struggling when you can master the craft in a weekend? Even veteran artists need a technical refresh every few years to stay competitive. The industry moves fast. Professional feedback from someone who has seen every lash disaster imaginable is priceless. They help you refine your hand positioning so you can stay in the game for the long haul without the burnout. Technical mastery is the only way to justify premium pricing in a market projected to reach USD 2.09 billion by 2035.
Your Path to Lash Boss Status
Your kit should be a badge of honor. To dominate your local market, you need tools that work as hard as you do. This means moving beyond basic gear to elite tweezers and revolutionary UV systems that eliminate the sticky struggle once and for all. But the tools are only half the battle. Joining the LivBay Lash Supplies community means you have a tribe of rebels backing you up. We provide the hype, the support, and the technical secrets to help you win. Ready to dominate? Shop the LivBay Lash Supplies Tweezer Collection and start isolating like a boss. Mastering how to properly isolate lashes for extensions is your ticket to the top 1%.
Claim Your Status as a Master Lash Artist
You’ve got the blueprint. From mastering the growth cycle to perfecting the Tape-Back method, you now have the technical edge to dominate the $1.33 billion global lash market. Isolation isn't just a step in your service. It is the high-stakes foundation of your entire brand. When you know how to properly isolate lashes for extensions, you stop being just another tech and start being a technical authority. No more stickies. No more hand fatigue. Just pure, clean artistry that keeps your clients obsessed and your retention rates legendary.
LivBay was founded by industry-leading master artists who know exactly what it takes to win in a busy salon. We've helped over 50,000 lash artists worldwide transform their craft with innovative UV and L.E.D. systems that change the game. It is time to stop playing small and start investing in the tools and education that actually move the needle. You've got the talent. We've got the gear.
Level Up Your Isolation Skills with LivBay Supplies and show the world what a boss artist looks like. Let’s get to work, lash bestie.
Frequently Asked Questions
How do I know if I have a lash sticky?
You have a sticky if two or more lashes are bonded together or if you feel resistance when combing through the set. At the end of every appointment, use your tweezers to check each lash individually. If they don't move independently from their neighbors, you need to separate them immediately to prevent discomfort and follicle damage. Clean work is the only way to keep your reputation flawless.
What are the best tweezers for isolating tiny inner corner lashes?
Straight or ultra-fine "crane" style tweezers are the absolute best for those tricky inner corners. These tools allow you to navigate the tight space near the bridge of the nose without losing your line of sight. Using a tool with a sharp, precise point ensures you can grab those tiny hairs without poking the client or losing your grip. Precision in the corners is what separates the pros from the hobbyists.
Does the tape-back method damage the client's natural lashes?
The tape-back method is completely safe if you use low-tack, medical-grade tape. Always de-tack the tape on the back of your glove or hand before applying it to the lashes. This ensures the adhesive isn't too aggressive when you pull it away. When done correctly, this technique is a game-changer for visibility and does zero harm to the natural lash line.
How long should it take to isolate each lash?
A seasoned boss artist should be able to isolate a single lash in 1 to 3 seconds. If you are struggling and taking longer, you likely need to upgrade your lighting or magnification. Speed comes with muscle memory and the right tools. Mastering how to properly isolate lashes for extensions at this pace is how you slash your set times and maximize your daily income.
What happens if I can't isolate a lash perfectly?
If you can't get a clean isolation, do not place the extension. It is better to skip a difficult lash than to create a sticky that pulls on the client's lid. You can always come back to that lash once you've placed extensions on the surrounding hairs to act as a barrier. Never compromise your technical standards for the sake of finishing a set faster.
Can I use a UV lash system if I'm a beginner at isolation?
Yes, and it is actually a massive advantage for beginners learning how to properly isolate lashes for extensions. Traditional glue stays wet and creates a "sticky window" where neighboring lashes can jump in. With a UV system, the bond is instant. This means you don't have to worry about accidental stickies while you are still perfecting your hand-eye coordination and tweezer grip.
How can I stop my hands from shaking during isolation?
Stop the shakes by using the Anchor Method and resting your pinky finger on the client's forehead for stability. This creates a fulcrum point that steadies your micro-movements. Also, watch your caffeine. While we all love a good energy boost, too much caffeine can trash your precision during a high-stakes mega volume set. Stay hydrated and stay steady.
Is it okay to leave baby lashes un-lashed?
Leaving the tiny "anagen" baby lashes alone is actually the professional thing to do. These hairs are in the earliest stage of growth and are too weak to support the weight of an extension. Trying to lash them often leads to premature shedding and damage. Focus on the mature lashes and let the babies grow so they are ready for the next fill.