

How to Lash Clients with Curly Natural Lashes: The Pro Artist’s Guide to Flawless Retention
Curly natural lashes are not the enemy; your standard placement technique is. We have all felt that internal panic when a client with tight, crisscrossed curls sits in the chair. You already know your isolation time is about to double. It is a total vibe killer when "curl chaos" leads to weak bonds and extensions that slide off before the set is even finished. You are a pro, and you deserve to feel like a total boss, not a tech struggling with a slippery base.
This guide is your ultimate shortcut to mastering how to lash clients with curly natural lashes without losing your mind. We are moving past basic applications to give you the advanced bonding secrets that turn difficult sets into high-retention masterpieces. You are about to learn how to achieve perfectly aligned sets and retention that hits the 4+ week mark every single time. We are diving deep into the technical world of under-lashing, adhesive viscosity, and high-speed isolation tricks that will make you the most sought-after artist in your city. It is time to level up your craft and leave the retention struggles in the past.
Key Takeaways
- Stop the isolation struggle by mastering the tape-back method to expose the base of even the most chaotic lash lines.
- Unlock the pro secrets of how to lash clients with curly natural lashes by using a 360-degree wrap technique that creates an unbreakable bond.
- Flip your perspective with under-lashing strategies that stop extensions from sliding off steep, upward-curving natural lashes.
- Future-proof your retention with UV technology that cures adhesive in one second, locking your placement before curl chaos takes over.
- Master the art of client communication by managing expectations for curly-haired babes so they keep coming back for those 4-week fills.
The Curly Natural Lash Struggle: Why Your Sets Are Sliding
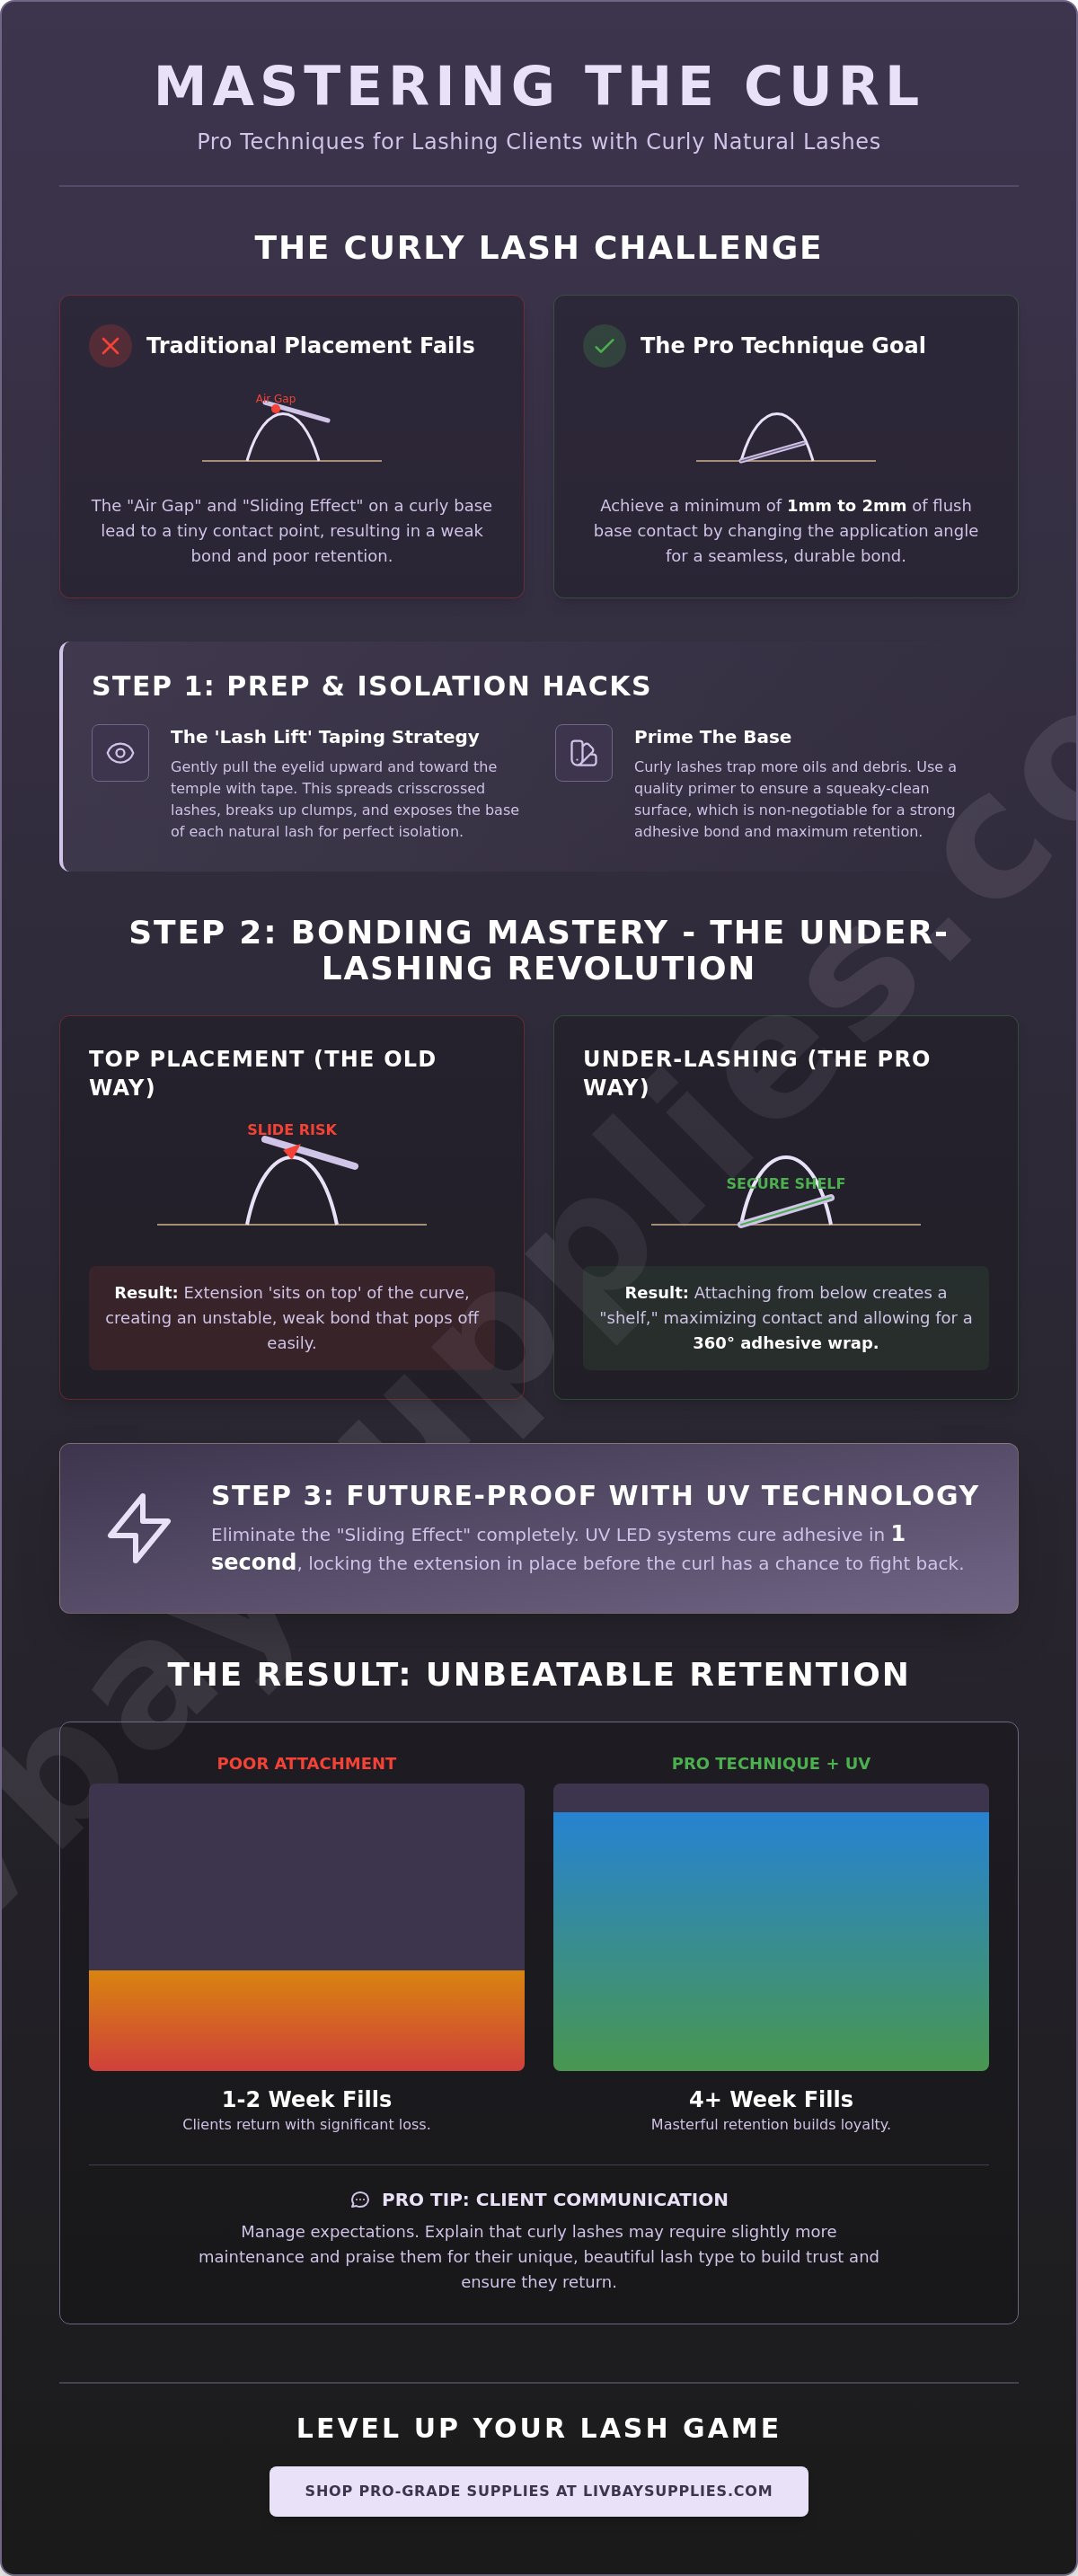
You have been there. A client walks in with lashes that look like they have been through a wind tunnel. Sharp upward loops. Sideways zig-zags. It is a total technical nightmare. These lashes do not offer a nice, flat shelf for your extension to sit on. Instead, you are fighting a sharp trajectory from the moment the lash leaves the follicle. When you are figuring out how to lash clients with curly natural lashes, you realize the rules of engagement have changed. The "Sliding Effect" is your biggest enemy. Traditional adhesive needs a second to grab, but on a curly base, that second is all it takes for the extension to slide down the curve. Result? A messy base and zero retention.
Symmetry is a massive headache because you do not have a straight path to follow. When every natural lash is pointing a different direction, maintaining a clean top line feels like a losing battle. While the history of eyelash extensions shows we have come a long way from basic strips, the struggle with natural curls remains the ultimate test for a pro. You have to be faster than the slide and more precise than the curve.
Identifying the 'Twisty' Lash vs. The Over-Processed Lift
Not all curls are created equal. Some are born that way; others are a cry for help. Natural curls have a consistent, rhythmic pattern from root to tip. Over-processed lashes from a botched lift? Those look fried. You will see frizzy tips and hooked ends that feel crunchy under your tweezers. You must test lash health before you even think about application. Give them a gentle tug with your isolation tweezers. If they lack elasticity or look "singed," your full set eyelash extensions strategy needs to pivot to damage control. Learning how to lash clients with curly natural lashes means knowing when to adjust your weight and diameter to protect a compromised lash line.
The #1 Retention Killer: Poor Base Attachment
The "air gap" is the silent killer of your lash business. When a straight extension meets a curly natural lash, they usually only touch at one tiny, microscopic point. That is a recipe for a 48-hour fail. You need a minimum of 1mm to 2mm of perfect, flush base contact. No exceptions. If you do not nail that attachment, the lash will pop off the second the client brushes them in the morning. A seamless wrap is the goal where the extension base and natural lash become one single unit without any visible ledge. Stop settling for "good enough" placement and start obsessing over the bond.
Prep and Isolation Hacks: Taming the Chaos Before You Attach
Isolation on curly clients usually feels like trying to untangle a necklace in the dark. It is frustrating. It is slow. If you don't get it right, you'll end up with stickies that ruin the natural lash health and kill your reputation. When learning how to lash clients with curly natural lashes, prep is where you win or lose the game. You need a clear view of the base. Otherwise, you are just guessing. Most techs fail here because they treat curly lashes like straight ones. They don't. They require a completely different tactical approach to the eyelid.
Your choice of lash tweezers is the literal difference between a smooth 2-hour set and a 4-hour marathon of misery. You need high-tension, precision tips that can navigate the twist without losing their grip. If your tweezers are dull or have a weak sweet spot, you will never master the isolation needed for these difficult sets. Precision is your only path to speed.
The 'Lash Lift' Taping Strategy for Maximum Visibility
Curly lashes often crisscross and hide the lash line. You cannot work on what you cannot see. Start by securing the bottom lashes with gel pads and tape like you normally would. Then, take a small piece of sensitive medical tape. Gently pull the eyelid upward toward the brow. The secret sauce? Angle that tape toward the temple. This spreads the natural lashes horizontally, breaking up those annoying clumps and exposing the roots. It is a total game-changer for your application speed. This systematic approach to eyelid manipulation allows you to see the "shelf" of each lash, making your placement instant and accurate.
Priming the Twist: Ensuring a Clean Bond
Curly lashes are basically magnets for oils and debris. Because of the sharp curve, dirt and skin cells get trapped at the root much easier than on straight lashes. A deep cleanse with a professional lash shampoo is your first line of defense against the sliding effect. Use a high-quality cleanser foam to ensure every microscopic bit of oil is gone. Once they are squeaky clean, use a primer to slightly open the hair cuticle. This gives your adhesive a textured surface to grab onto. Just don't go overboard. If you over-prime, the lash becomes too slippery for a curly base. You want a tacky grip, not a wet mess. Mastering how to lash clients with curly natural lashes requires this perfect balance of moisture and chemical prep.
Bonding Mastery: Choosing the Right Angle and Extension Curl
Top-lashing a naturally curly client is a recipe for a 404 error in your retention. When the natural lash curves sharply upward, placing an extension on top creates a massive air gap at the base. It is a disaster. To master how to lash clients with curly natural lashes, you have to change your angle of attack. Under-lashing or side-lashing are the only ways to ensure your extension base sits flush against that curved surface. Under-lashing is particularly powerful for those "heaven-reaching" curls because it allows the extension to support the natural lash from beneath, creating a stable foundation that won't budge.
The "Wrap" technique is your secret weapon for 360-degree security. Instead of just "placing" the lash, you want to slightly wiggle or "wrap" the base of the extension around the natural lash as you set it. This ensures the adhesive fully encases the natural lash, locking it in place. If you are struggling with the timing, modern lash technologies like UV systems can be a total lifesaver. They allow you to hold that perfect wrap and cure it instantly with a light pulse, stopping the "twist" before it even starts. It is about working smarter, not harder, to get that high-end finish your clients obsess over.
The Extension Curl Cheat Sheet for Curly Clients
Choosing the wrong curl is the fastest way to make a set look messy. If the natural lash is already a tight D-curl, adding another D-curl extension will result in a "loop" look that looks unnatural and tangles easily. Stick to B or C curls for these clients. These flatter curls "fill the gap" of the natural curve, providing more surface area for the bond. If you want that trendy, snatched look, L and M curls are your secret weapon. Their flat base provides a perfect landing pad on a curly lash, while the sharp flick at the end gives the lift your client wants without the base-attachment struggle.
Side-Bonding: The Ultimate Technique for Crisscrossed Lashes
When lashes are crisscrossing like a freeway interchange, side-bonding is the only way to maintain your sanity. Approach the natural lash from the side where the curve is the least aggressive. By applying the extension at a 90-degree angle to the direction of the natural growth, you can "straighten" the appearance of the set without stressing the follicle. Side-bonding maximizes the surface area for best eyelash glue contact. This lateral attachment provides a much more stable bond than trying to force a top or bottom placement on a lash that is already leaning to the left or right. It is a technical move that separates the amateurs from the true lash authorities.
Revolutionizing the Set: Using UV Technology for Instant Retention
Traditional adhesives are dramatic. They need the perfect humidity, the right temperature, and a "wait-and-see" approach that just doesn't work when a natural lash is twisting. UV systems are the ultimate game-changer for the modern artist. Instead of waiting for a moisture cure that can take up to 24 hours to fully set, you hit the bond with a 1-second light pulse. It is locked. No sliding. No leaning. This is exactly how to lash clients with curly natural lashes without the constant stress of a failing bond. You are in total control of the cure time, which means the lash stays exactly where you placed it.
The "sticker" problem is a total vibe killer in the salon. When you have lashes crisscrossing like a freeway interchange, a wet extension is a magnet for neighboring lashes. UV curing kills that risk instantly. You isolate, place, and zap. The adhesive is dry before you even move your tweezers. This allows for much tighter isolation on messy lash lines because you don't have to worry about "stickies" ruining your work. You can work lash-to-lash without skipping around the eye to let glue dry. It turns a chaotic 3-hour set into a streamlined, high-energy session that proves your technical authority.
Why UV Systems Stop the 'Lash Slide' for Good
The science of instant polymerization is what separates the pros from the amateurs. Traditional adhesives rely on a slow reaction with moisture in the air. On a curly base, the extension often wants to rotate or slide down the curve during that reaction. UV systems eliminate this window of failure. When you are mastering how to lash clients with curly natural lashes, you need that instant grip to counteract the natural trajectory of the hair. Position your UV lamp so the beam hits the base directly. This 1-second cure ensures the extension stays flush, giving you that high-end look that lasts for weeks.
Precision Placement with L.E.D. Technology
Ergonomics matter if you want a long-term career in this industry. A foot-pedal system is the ultimate boss babe flex because it keeps your hands free to maintain that perfect 360-degree wrap. For mega volume fans, you can "flash cure" the base. This locks the fan open on the curly natural lash before it can collapse or twist. Since May 2026, the industry has seen a massive shift toward these systems because they reduce fumes and irritation. The beam is targeted, making the "taping up" process way more comfortable for your client. They will be obsessed with the lack of "red eye" and the insane 4-week retention.
If you are ready to stop fighting the humidity and start winning the retention game, it is time to invest in the latest lash technologies. Your business deserves the upgrade.
The Pro Portfolio: Troubleshooting and Client Communication
You have mastered the wrap. You have got the UV light ready. Now you need to handle the human side of the hustle. Clients with naturally curly lashes are high-maintenance by nature. Their lashes move, twist, and grow in directions that straight lashes just don't. If you don't communicate this upfront, you will be the one getting a frantic "my lashes are messy" text at midnight. Managing expectations is a massive part of the job. You are a professional authority, and that means being honest about how their natural hair type affects the longevity and look of their set.
Troubleshooting a droopy set is a common hurdle when learning how to lash clients with curly natural lashes. If the set looks heavy or starts to sag, you likely used a curl that was too aggressive or an extension with too much diameter. A natural curl already has plenty of "lift." Adding a heavy volume fan can overwhelm the follicle and cause the lash to tip forward. If you see drooping, pivot to a finer diameter or a flatter curl like a C-curl to keep the set looking snatched and upright.
Time is money. If isolation is taking you an extra 30 minutes because you are fighting "curl chaos," you should be charging for it. A "technical difficulty" premium isn't greedy; it is professional. You are providing a specialized service that most techs avoid. Position yourself as the expert who can handle the difficult sets, and your "lash besties" will happily pay for that peace of mind.
Avoiding the 'Rookie Twist' Mistake
Don't over-glue. It is tempting to use more adhesive to "force" a bond on a curly base, but excess glue adds unnecessary weight. That weight is what causes the extension to lean or twist. Use a lash mirror to check your work from the bottom. This is the only way to see if the bases are lifting or if there are gaps in your bond. If you see a lift, remove it and start over. No shortcuts allowed. Mastering how to lash clients with curly natural lashes requires an obsession with a clean, flush base that only a mirror can confirm.
Setting Expectations for the 3-Week Grow-Out
Educate your client on the reality of their lash cycle. Explain that as their natural curl grows, the extension will naturally start to rotate. It is simple physics. Straight lashes grow out straight; curly lashes grow out in a spiral. Tell them spoolies are non-negotiable. They must brush daily to keep those curls aligned and prevent tangling. For clients with extreme natural curls, suggest a 2-week fill schedule instead of the standard 3. It keeps the set looking fresh and prevents the "twisty" look from taking over their aesthetic. Your reputation depends on how good their lashes look on day 14, not just day 1.
Turn Curl Chaos into Your Competitive Edge
You have the tools. You have the technique. Now it is time to execute. Mastering how to lash clients with curly natural lashes is the ultimate flex for any artist looking to dominate their local market. By ditching the "rookie twist" and embracing strategic isolation like the tape-back method, you are no longer just a tech; you are a technical authority. Remember that 1mm to 2mm of flush base contact is your non-negotiable rule for 4-week retention. You have learned to swap out aggressive curls for flatter bases and how to wiggle that extension for a 360-degree bond that actually lasts.
Stop letting difficult sets slow down your hustle. It is time to join the 50,000+ boss babe lash artists who have already revolutionized their business. Upgrade to the LivBay UV System and master curly lashes forever! With a 1-second instant cure that eliminates the sliding effect, you can reduce your lashing time by up to 30% on even the most chaotic sets. No more stickies. No more stress. Just flawless sets and insane retention that keeps your books full. You have the skills to be a leader in this industry. Go out there and prove it.
Frequently Asked Questions
Can you lash someone with a bad lash lift?
You should wait for the natural lash cycle to replace those fried hairs before lashing a bad lift. Applying extensions to brittle, over-processed lashes leads to breakage and a total retention disaster. It usually takes 6 to 8 weeks for a fresh, healthy set to grow back in. Don't risk your reputation on a compromised base; tell your client to focus on lash serums and come back when their natural health is restored.
What is the best extension curl for naturally curly lashes?
B and C curls are the ultimate winners for naturally curly sets. These flatter curls provide a much larger surface area for the bond compared to tight D curls. If your client wants an edgy, lifted look, reach for L or M curls. Their flat base is a revolutionary match for curly natural lashes because it creates a seamless landing pad while the tip provides that high-end flick.
How do I stop my extensions from sliding on curly natural lashes?
You stop the slide by mastering the 360-degree wrap and ensuring at least 1mm of flush base contact. If your adhesive is too slow, the extension will rotate or slip down the curve before it sets. Switching to a high-viscosity glue or a UV curing system locks the placement instantly. This is the only way to beat the curl chaos that ruins your symmetry and speed.
Is UV lash glue better for curly lashes than traditional glue?
UV lash glue is absolutely the holy grail for this technical challenge. When learning how to lash clients with curly natural lashes, you realize that traditional moisture-cure adhesives just aren't fast enough. The 1-second UV pulse creates an instant polymerization that freezes the extension in place. This technology eliminates the sliding effect entirely, giving you 4+ weeks of retention that traditional glues can't touch.
Why do curly natural lashes have worse retention?
Poor retention happens because the sharp curve of a curly lash creates a microscopic air gap at the bond. If you don't achieve perfect base attachment, the extension will pop off within 48 hours. This technical struggle is why knowing how to lash clients with curly natural lashes is so valuable. You have to be obsessed with the wrap technique to ensure the adhesive fully encases the natural hair.
Should I use a primer on curly natural lashes?
Yes, using a primer is a smart move to slightly open the hair cuticle. This gives your adhesive a textured surface to grab onto, which is critical for a curved base. Just make sure you don't over-prime. If the lash becomes too wet or slippery, your extensions will slide right off. Use a micro-brush for precision and keep the application focused on the base where you need the most grip.
How do I isolate crisscrossed curly lashes faster?
The tape-back method is the fastest way to handle a crisscrossed lash line. Use a small piece of sensitive tape to pull the eyelid upward and toward the temple. This horizontal stretch separates the roots and exposes the shelf of each lash. It turns a nightmare isolation session into a streamlined process, allowing you to hit your targets with high-speed precision and zero stickies.
Can I use volume fans on naturally curly lashes?
You can definitely use volume fans, but you must be a diameter detective. Curly lashes already carry a lot of natural lift, so adding too much weight will cause them to droop or twist. Stick to 0.03 or 0.05 diameters for your fans. Using a UV system to flash cure the base is also a game-changer because it prevents the fan from collapsing on the curved natural lash.