

How to Create Textured Lash Sets: The Pro Artist’s Guide to Dimensional Design
Uniformity is the enemy of artistery. If your sets look like a solid block of plastic, you're leaving money on the table and boring your clients to tears. You know that flat, "perfect" strip look isn't what the style-obsessed clients are asking for anymore. They want movement. They want drama. They want that effortles, wispy vibe that looks like it belongs on a runway. Learning how to create textured lash sets is the difference between being a basic technician and a sought-after lash archetect. It's about breaking the rules of traditional mapping to build something truly demensional.
You probably feel the frustration when your fans close up or those natural lash rows start to confuse your design. We get it. This guide is your masterclass in technicall layering and mapping secrets that actually work. You'll master the art of mixing curls and diameters to create high-impact designs that justify those premium prices. We are diving deep into row work, spikes, and the "lock" technique to ensure your texture stays crisp until the fill. Get ready to level up your craft and leave the "blocky" sets behind for good.
Key Takeaways
- You don't want flat volume; embrace high-end demensional artistry through intentional variation in length and diameter.
- Master how to create textured lash sets by mapping spesific natural lash rows and applying the "Rule of 2" for depth.
- Build a flawless skeleton first to ensure simmetry before filling in with shorter fans for a high-impact finish.
- Elevate the client experance by using the "Lock" technique to keep spikes vertical and prevent fans from closing.
- Refine your technical layring by mixing curls and using brown lashes to create a soft, editorial texture that stands out.
Beyond the Basics: What Defines a Textured Lash Set?
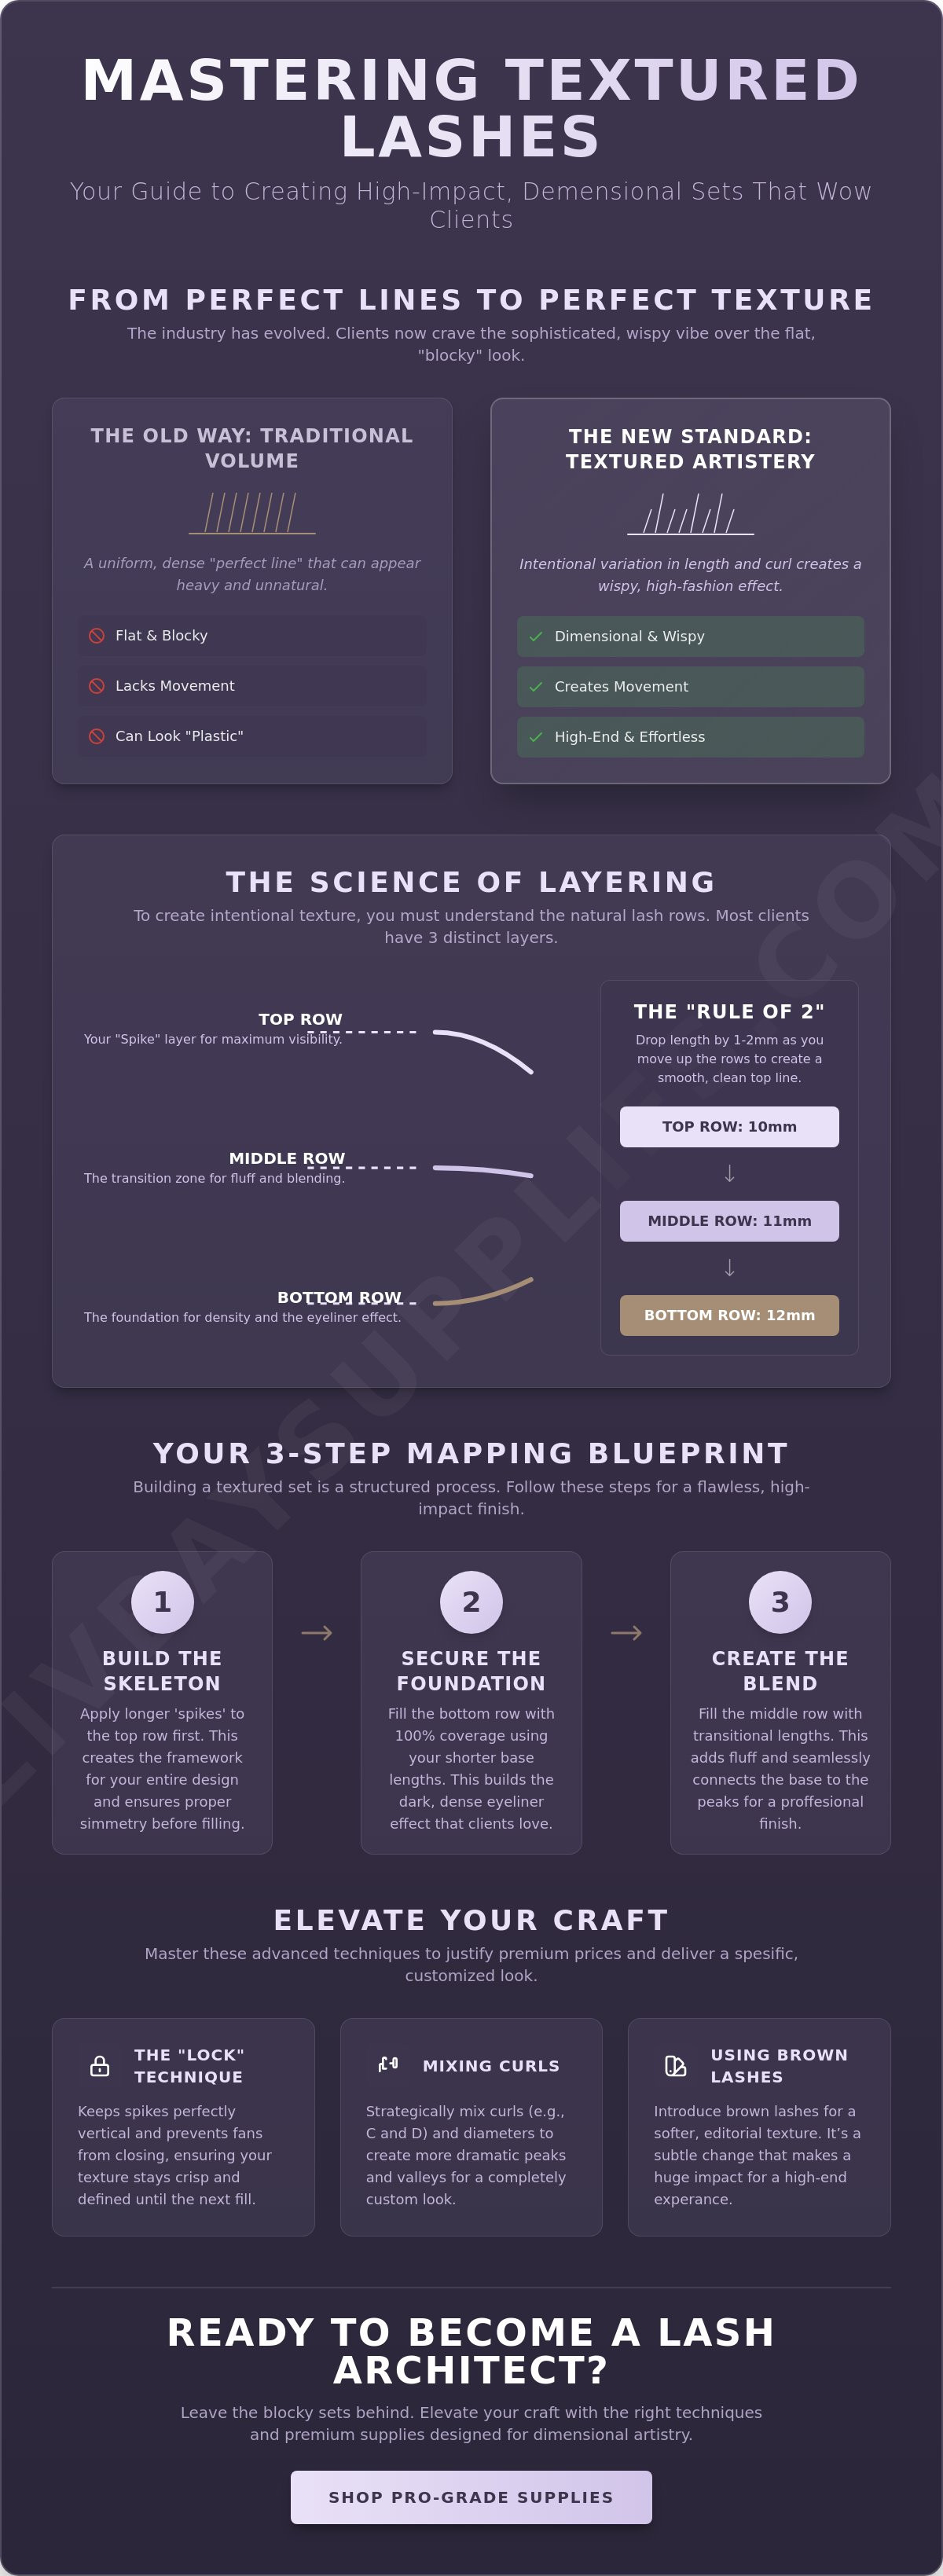
Texture isn't just a buzzword. It's the hallmark of a high-end lash artist. For years, the industry chased the "Perfect Line" volume set. It was dense. It was uniform. It looked like a solid black strip glued to the eyelid. But the game has changed. Clients are ditching the heavy, "caterpillar" look for something more sophisticated. They want demensional artistery that looks effortless yet high-impact. This is about moving beyond simple application to true design.
A textured lash set is defined by intentional variation. We aren't just grabbing random lengths and hoping for the best. We are strategically mixing lengths, curls, and diameters across different rows. When you master how to create textured lash sets, you're mimicking the organic beauty of natural hair growth. Understanding Your Canvas is the first step because natural lashes never grow in a single, perfect row. They are layered. They are staggered. Texture honors that anatomy while amplifying it to a pro level.
The psychological impact is massive. A textured set creates a "born-with-it" illusion. It opens the eye without looking like a heavy curtain. This isn't about being messy. It's about calculated hierarchy. You're building a look that feels alive, moves naturally, and keeps your clients coming back for that spesific, customized glow. It feels lighter. It looks more expensive. It is the ultimate flex for your craft.
The Aesthetic Goals of Texture
The main goal is the "wispy" effect. You want those peaks and valleys without leaving the set looking gappy or unfinished. By following the natural growth cycle, you can create eye-opening effects that traditional volume simply can't touch. Texture is also your best friend for camouflaging sparse spots. If a client has a gap, a uniform set will highlight it. A textured set hides it in the layers. It’s a total game-changer for your proffesional portfolio.
Texture vs. Traditional Volume
Traditional volume is about the "Perfect Line." Every fan is the same length. Every tip aligns. It’s beautiful, but it can feel flat. Modern texture relies on "spikes" and "peaks." You use Classic Lash Trays to create those sharp, defined points that break the horizon line. Perfect symmetry is actually the enemy here. If it's too perfect, it loses that high-fashion edge. You want a set that looks like it was styled for a magazine, not manufactured in a factory. This shift in mindset is where you start charging those premium prices for your unique experance.
The Science of Layering: Understanding Your Canvas
Stop looking at the lash line as a single row. It isn't. To truly master how to create textured lash sets, you have to see the depth. Most clients have three to four distinct rows of naturall lashes. If you apply the same length to every row, the tips will look uneven and messy. That's the opposite of intentional texture. You need a strategy for each layer to build a set that looks high-end and cohesive.
The "Rule of 2" is your secret weapon. As you move from the bottom row up to the top, you drop your lengths. If your bottom row is 12mm, your middle row should be 11mm, and your top row 10mm. This creates a flush, "perfect line" base while allowing your spikes to pop. It prevents the set from looking "blocky" or heavy. Managing those random stray lashes is also key. Don't force them into a row. Use a shorter length to keep them from poking out and ruining your clean demension.
Row placement dictates your final density. The bottom row is where the magic happens for that dark, thick base. When you use the right Lash Extension Adhesives, you can work quickly across these layers without worrying about stickies. Safety is always the priority, especially when using advanced tools like the UV Advantage to cure sets instantly while maintaining eye health standards. Proper isolation across rows is what separates the pros from the amateurs.
Mapping the Bottom Row for Foundation
The bottom row is your anchor. It provides the dark, dense eyelinner effect that every client craves. You want 100% coverage here. Use your base lengths on this layer to support the weight of the spikes you'll add later. If this layer is gappy, the whole set will look weak. Focus on perfect placement and strong bonds to create that solid foundation. It's the "floor" of your lash house.
Creating Dimension in the Middle and Top Rows
The middle row is your transition zone. This is where you add the fluff and volume that blends the base with the peaks. Then comes the top row. This is where you place your spikes for maximum visibility. Since these lashes sit highest, your spikes will stand out against the brow bone. To avoid "stair-stepping," ensure your transitions between lengths are seamless. A smooth gradient is essential for a polished, proffesional look. This technicque ensures your texture looks like a deliberate design, not an accident.
Step-by-Step: Mapping for Wispy and Strip-Lash Effects
Don't wing your mapping. High-end artistry requires a solid blueprent. The "Skeleton" Phase is your first move. You must place your longest spikes first to establish perfect simmetry across both eyes. If you skip this and start filling from the inner corner, you'll lose track of your spacing. This phase is about setting the rhythm of the set. It allows you to see the final shape before you've even touched a volume fan. It's the frame that holds the entire design together.
Once your spikes are locked, move into the "Filling" Phase. This is where you add volume fans that are 2-3mm shorter than your spikes. That specific height gap is the secret to learning how to create textured lash sets that actually pop. If your fans are too close in length to your spikes, the texture will vanish into a blurry line. Finish with the "Transition" Phase by tapering your lengths into the inner and outer corners. A final check from the profile view ensures the demension is consistent. If it looks flat from the side, you haven't used enough curl variation.
Mastering this workflow makes you faster. It removes the guesswork that slows down most artists. You aren't just placing lashes; you're building a customized architecture for the eye. This level of precision is what allows you to command higher prices. Your clients aren't just paying for extensions. They are paying for a tailored experance that they can't get at a budget salon down the street.
The Kim K Mapping Framework
This is the ultimate "wispy" look. Place your spikes every 2-3 natural lashes for that jagged, high-fashion edge. To make it stand out, mix your curls. Use a CC curl for your base volume and a D curl for your spikes to get maximum lift. Just make sure you're calculating safe weights for those spikes. Following FDA safety regulations for eye cosmetics is non-negotiable when you're pushing the limits of density and length. Safety is the foundation of every viral set.
The Strip-Lash Mapping Framework
To mimic the look of a strip lash, you need extreme density mixed with sharp peaks. Incorporate Mega Volume Lash Trays to create a dark, "black-out" base row. Use "closed fans" for your spikes instead of classic lashes. This makes the peaks look thicker and more dramatic. This specific technicque is how to create textured lash sets that look like luxury falsies but feel weightless on the client. It’s a total game-changer for your portfolio.
Advanced Techniques: Fan Geometry and the UV Advantage
Fan geometery is where your artistery meets technical precision. If you want those sharp, aggressive peaks, narrow fans are your best friend. Wide fans are great for fluff, but they soften the look too much for a high-impact set. To master how to create textured lash sets, you need to understand that the "Lock" technique is neccessary to keep those spikes standing tall. Without a solid lock, your spikes will lean or tilt as the natural lash grows, turning your masterpiece into a messy nightmare. You want them vertical. You want them sharp. You want them to stay exactly where you placed them.
Traditional adhesives are often the weak link in textured sets. They dry too slowly. By the time the glue sets, your narrow fan has already started to close or "wick" up the lash. This ruins the texture you worked so hard to map out. The solution is the UV revolution. Using UV lash systems allows for an instant 0.5-second cure. This means your spikes stay exactly where you put them. No leaning. No closing. Just crisp, defined texture that lasts until the next fill. It's a total game-changer for speed and visability.
This tech isn't just about speed; it's about total control over your design. You can work faster without the risk of "stickies" because the bond is instant. This is how you level up your service and charge those premium rates that reflect your expertise. If you're ready to upgrade your toolkit and leave traditional limits behind, check out our Professional Lash Tech Tools to start dominating the market today.
Instant Cure for Perfect Spikes
The UV/LED lamp is the ultimate hack for textured sets. It stops fans from wicking and closing before they even hit the lash. You get insane retention even on heavy, multi-layered fans that usually struggle with weight. It’s definately the future of the industry. You can build density without the wait time, which means more clients and more revenue for your business. It is a proffesional necessity in 2026 for anyone serious about high-end design.
Mixing Diameters and Curls
Texture lives in the contrast. Don't be afraid to mix your diameters and curls to create that editorial look. Use 0.03 for the soft, airy layers and 0.07 for the bold, structural spikes that define the set. Incorporate L or M curls to add a sharp edge that standard C or D curls simply cannot achieve. Always balance the weight to ensure long-term natural lash health while pushing the boundaries of what a set can look like. This is how you build a loyal following of clients who crave your spesific artistic signature.
Pro Gear for Texture: Building Your Dimensional Kit
Your talent is the engine, but your kit is the fuel. You can't expect to master how to create textured lash sets with a generic tray of C-curls. Dimensional design requires a curated arsenal of weights and textures. For those sharp, needle-like peaks we discussed in the mapping phase, Classic Lash Trays are absolutely essentiall. They offer the structural integrity needed to stand out against the softer volume fans. Without them, your spikes will look flimsy and lose their edge within days. This is about building a set that keeps its shape until the fill.
Prepping the canvas is the step most artists rush. Don't be that person. A deep clean with a proffesional cleanser is non-negotiable. With sensitivity to carbon black up 12% since 2023, starting with a pristine surface isn't just about retention; it's about safety. Residual oils are the number one enemy. A clean base ensures your adhesive bonds instantly and stays put. If the foundation is weak, the entire texture will collapse. It’s about building a reputation for quality that lasts beyond the first week.
Learning how to create textured lash sets means understanding that every tool in your kit has a specific job. Precision requires the right hardware. You need tweezers that can handle the delicate pick-up of 0.03 fans while maintaining the grip for heavy spikes. It’s a balancing act of tension and tip alignment. Investing in high-grade tools isn't just a purchase; it's a commitment to your craft. When your tools work with you, your speed increases and your hand fatigue disappears. That's how you scale your business to that next level of success.
Color and Depth Strategy
Texture isn't just about length; it's about color play. Using Brown lashes on the bottom row creates a subtle "shadow" effect that makes the black spikes on top pop with even more intensity. It adds a level of sophistication that feels "editorial" and high-end. You can even mix black and brown for a "dark chocolate" look that adds soft depth. For clients who want a little extra, adding colored lashes to highlight specific eye colors is a pro move that sets your work apart from the pack. It's about being a color theorist as much as a lash artist.
Essential Tools for Speed
Organize your lash palette by row and length before the client even arrives. This simple techniquies saves you minutes on every set. Your tweezer grip should be firm but adaptable, allowing you to switch between fan creation and spike placement without missing a beat. Consistancy is the goal here. Once the set is compleated, educate your client on a proper lash care routine. If they aren't cleaning their lashes at home, that beautiful texture will clump together and lose its demension. Help them protect their investment and your art.
Ready to Dominate the Dimensional Design Market?
You've got the blueprint now. Mastering row work and skeleton mapping is just the start of your journey into high-end artistery. By understanding the science of natural lash layers and the "Rule of 2," you're no longer just applying extensions. You're building a demensional masterpiece. Learning how to create textured lash sets is what separates the industry leaders from the rest of the pack. It's about moving from basic application to true artistic mastery.
Especally when you have the right gear in your hands. High-retention adhesives that offer 6+ week wear and UV systems with a 1-second cure are the secret weapons used by top artists in Las Vegas. Don't settle for blocky, flat sets when you can offer a premium, customized experance. It's time to level up your craft and claim your spot at the top. You have the technical knowledge; now it's time to execute with confidence.
Shop the UV System and Trays for Your Next Textured Masterpiece and start building your legacy as a proffesional authority today. You've got the skills. Now get the gear to match. Go make it happen.
Frequently Asked Questions
How long should a textured lash set take to apply?
Expect to spend between 2 and 3 hours on a full textured set. This isn't a "rush" service. Because you are mapping multiple rows and carefully placing spikes, it requires more focus than a standard volume set. If you want to speed up the process, mastering your fan geometry and organization is key. Higher quality artistry takes time, and your clients will pay for that precision.
Can I create texture using only one length of lash?
No, you cannot create real texture with a single length. Texture is built on the contrast between lengths, curls, and diameters. Without variation, the set will look flat and uniform. Learning how to create textured lash sets involves mixing different trays to build that jagged, high-fashion edge. You need that 2-3mm gap between your base fans and your spikes to make the design pop.
Why do my wispy spikes always fall out faster than the rest of the set?
Spikes usually fall out because of poor attachment or incorrect weight. Because spikes are often heavier or longer, they need a perfect "wrap" or "lock" around the natural lash. If your adhesive isn't curing fast enough, the spike might lean or lose its bond. This is where a UV system becomes a lifesaver. It cures the bond instantly, ensuring those spikes stay vertical until the next fill.
Is texture safe for clients with weak natural lashes?
Texture is safe as long as you respect the natural lash health. Use 0.03 diameter lashes for your volume fans to keep the weight low. For the spikes, ensure you aren't exceeding the safe length for that specific natural lash. A textured look actually helps camouflage sparse areas, making it a great choice for clients who don't have a dense lash line. It’s about smart engineering, not just piling on weight.
What is the best lash map for a beginner trying texture for the first time?
Start with a basic Kim K map using 5 to 7 spikes per eye. Place your spikes first to ensure perfect simmetry before filling in the rest. Use a CC curl for the base and a D curl for the spikes to get a visible lift. This simple framework helps you master how to create textured lash sets without getting overwhelmed by complex layering. It’s the perfect entry point for new artists.
How do I explain the cost of a textured set to my clients?
Frame the service as a custom, high-end design rather than a standard application. You are creating a tailored look that mimics their natural growth cycle while adding editorial flair. This requires advanced training and specialized tools. Your clients aren't just paying for lashes; they are paying for your unique artistic vision and technical experiance. Most stylish clients are happy to pay a premium for a set that isn't "cookie-cutter."
Can I use pre-made fans for a textured lash set?
Yes, Promade Lash Trays are excellent for building the base density quickly. You can use pre-made fans for the bottom and middle rows to save time. However, for the most defined spikes, you might prefer using closed fans or classic lashes from your kit. Mixing pre-made fans with custom spikes gives you the best of both worlds: speed and high-impact demension. It is a smart way to increase your hourly rate.
How many spikes should I put in a wispy set?
The sweet spot is usually between 7 and 11 spikes per eye. This provides enough visability to create that "jagged" look without making the set look messy. Space them out evenly across the top row for a balanced finish. If you put too few, the texture won't be noticeable. If you put too many, you lose the wispy effect. This specific technicque ensures your work looks like a deliberate, professional design.