


A cookie-cutter lash set is the fastest way to tank your reputation in 2026. You've seen it happen. A client walks in with a photo that just won't work for her eye shape. If you say yes, she leaves with a set that looks heavy or "off." Mastering the art of creating custom lash styles for clients is no longer optional; it's the only way to survive in a market that demands bespoke artistry. You want your work to look beautifull, not basic.
We all agree that the days of "one map fits all" are dead and buried. You're here because you want to stop guessing and start leadinng the industry with sets that actually last. This guide promises to turn you into a mappingg genius, giving you the tools to analyze any face and choose the perfect weight for maximum retention. We'll preview the latest 2026 trends, from UV-cured systems to the rise of brown fibers, so you can offer a truly proffessional experience. It's time to stop being a lash tech and start being a designer who can recommmend the perfect look every single time.
Key Takeaways
- Stop guessing and start mapping. Learn why bone structure is the real foundation for a profesional set.
- Master the blueprint for creating custom lash styles for clients. Use a 5-step tecnique to nail the perfect look every time.
- Use brown lashes and color pops to win. It's the secret to artistic sucess that sets you apart from the crowd.
- Level up with UV tech. Build high-retention sets that make every client recomend your studio to their entire circle.
- Own the consultasion. Learn how to handle "Pinterest fails" and guide your clients toward styles that actually flatter them.
Mastering the Canvas: Analyzing Face Shapes and Eye Anatomy
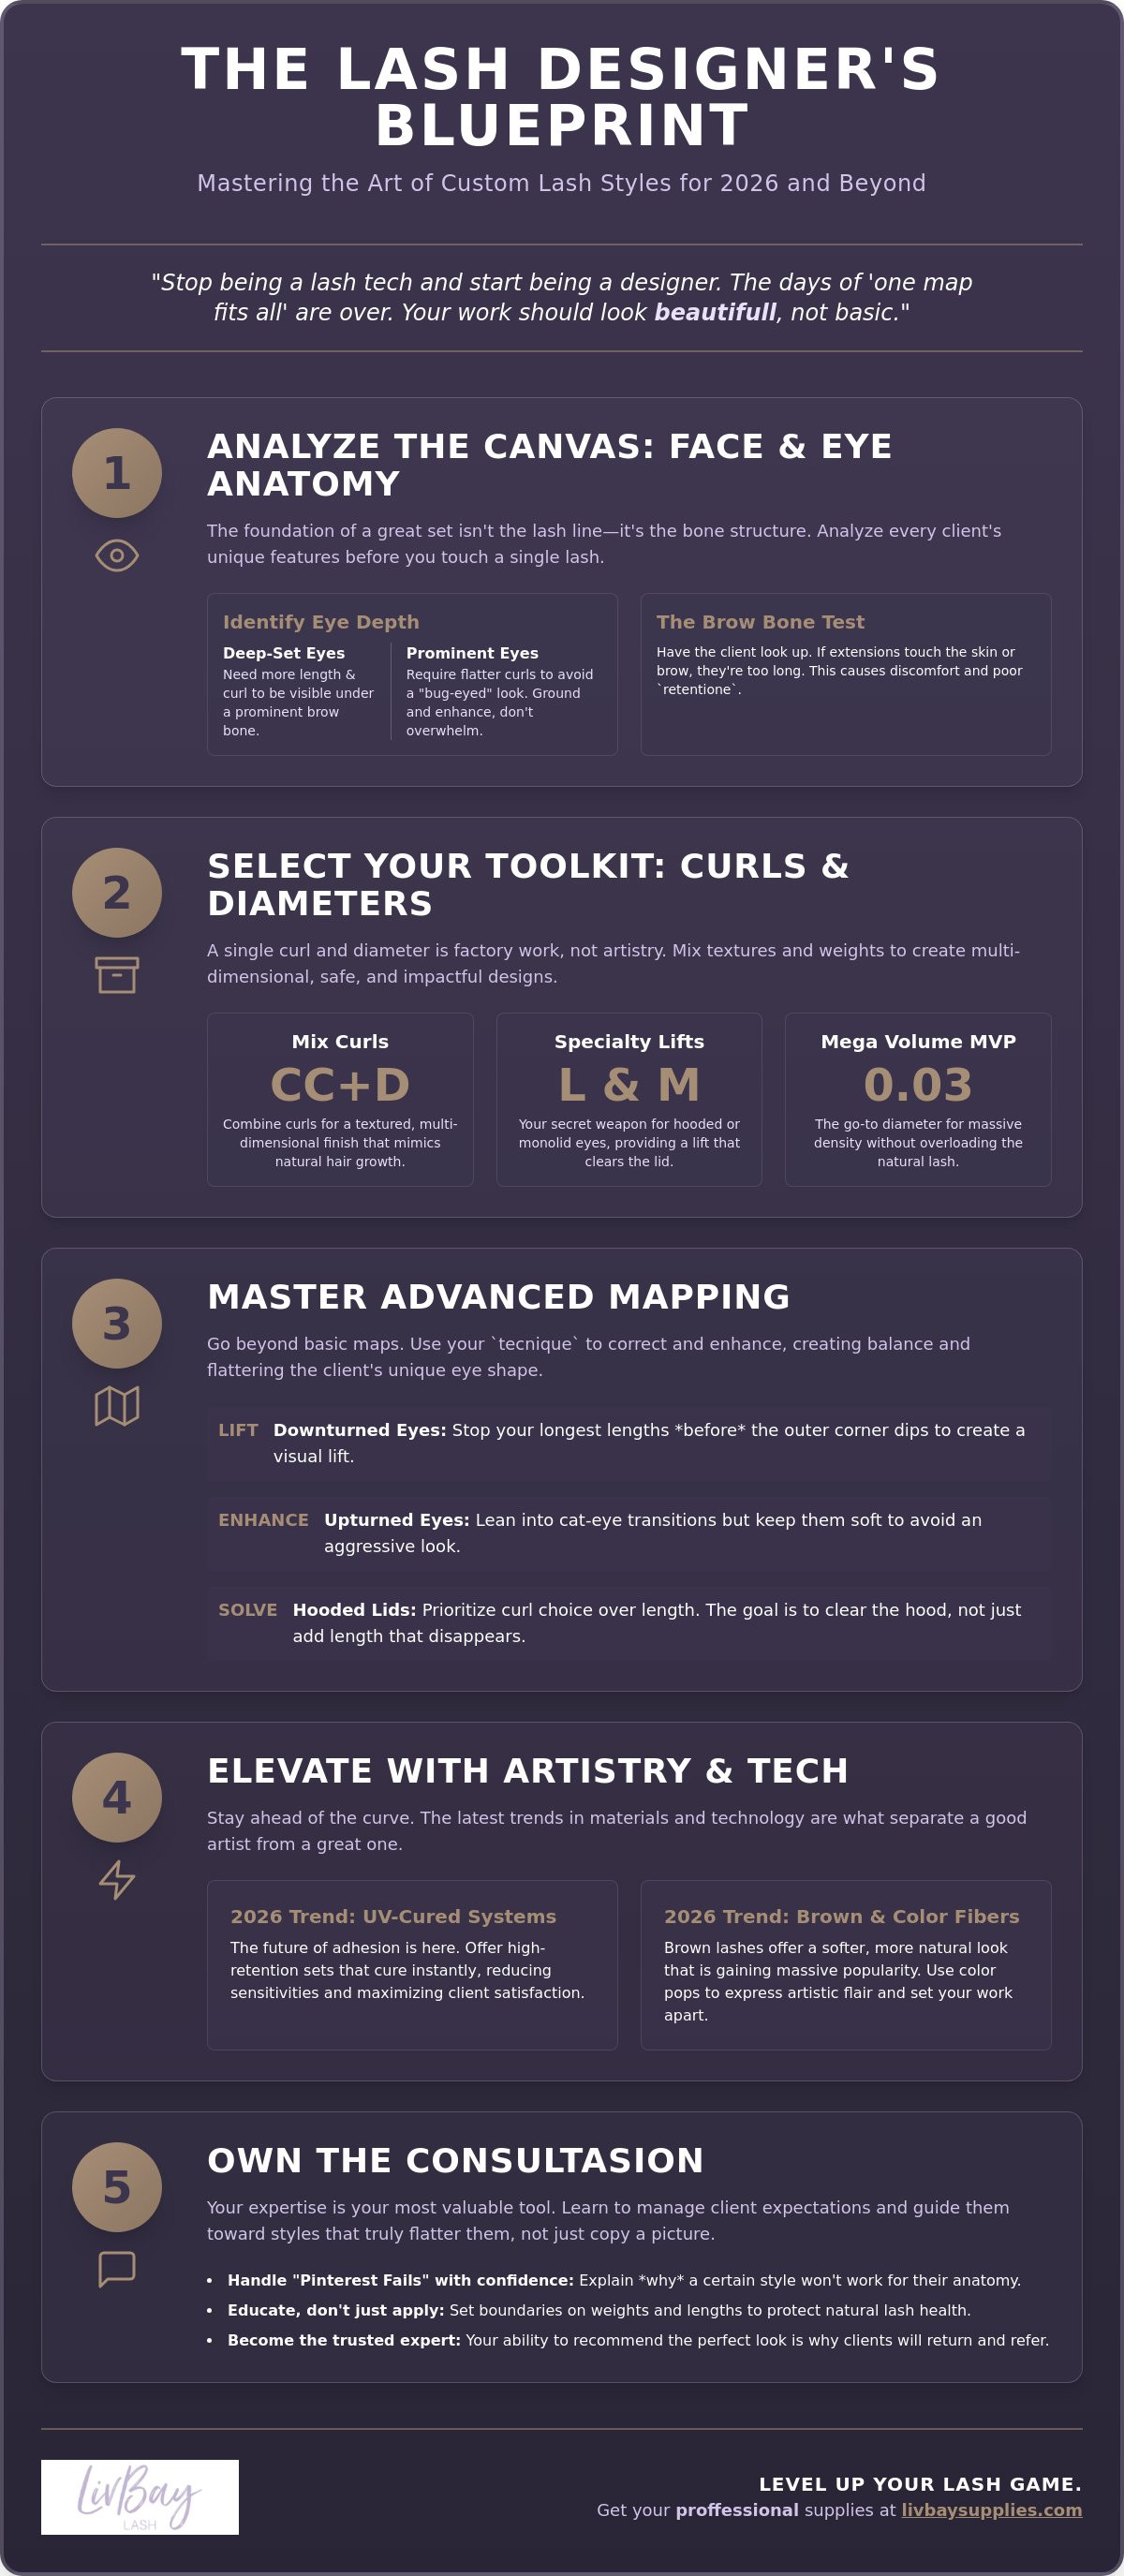
Before you even touch a tray of Mega Volume lashes, you have to look at the bones. Most artists focus on the lash line, but creating custom lash styles for clients starts with the actual anatomy of the face. If you ignore the orbital bone or the brow ridge, you're just gluing hair to a face without a plan. That's how you end up with sets that look heavy or saggy. Every face has a unique structur that dictates where your peaks and valleys should live. You aren't just a technician; you're an architect for the eyes.
Identify eye depth immediately. Deep-set eyes sit further back in the socket, often shadowed by a prominent brow bone. These clients need more length and specific curls to actually be seen. Prominentt eyes are the opposite. They sit forward and can easily look "bug-eyed" if you go too long or too curly. You want to ground these eyes with flatter curls and strategic mapping that doesn't overwhelm the face. It's about enhancing what's there, not just adding bulk. Stop guessing and start analyzing.
Use the "Brow Bone Test" on every single client. Have them open their eyes and look straight up. If those lash extenshions hit the skin or the brow bone, you've gone too long. This causes discomfort and premature shedding. You must also analyze natural lash health and strength. A client might want a thick Mega Volume set, but if their natural lashes are thin or weak, you have to scale back. Safety is the foundation of high-end artistry. You are the expert; don't be afraid to set boundaries on weight limits to protect the integrity of the natural lashes.
The Geometry of the Face
Think of the face as a puzzle that needs solving. Wide-set eyes often need more drama and length in the inner corners to create the illusion of them being closer together. If your client has a narrow or long face, you want to build width. Focus your volume and length on the outer corners to pull the gaze outward. Square jawlines can sometimes feel sharp or masculine. You can soften this look by using rounded doll-eye patterns. This pulls the focus to the center of the eye and creates a more feminine, open balanc for the entire face.
Eye Angle and Placement
Lifting downturned eyes is a high-level skill. You have to be careful not to follow the natural downward slope too far. Stop your longest lengths before the outer corner begins to dip. For upturned eyes, you can lean into cat-eye transitions, but keep them soft so the look doesn't become aggressive. Hooded lids are the ultimate challenge for any pro. Curl choice is much more important than length here. You need a curl that clears the hood of the lid without rubbing against it. Mastering these eyelash extension techniques is what makes you a designer. This level of tecnique ensures your clients keep coming back for that bespoke magic only you can provide.
The Toolkit: Selecting Curls, Lengths, and Diameters for Impact
Your toolkit is your arsenal. If you're still using one curl and one diameter for an entire set, you aren't creating custom lash styles for clients; you're just assembling a factory product. To reach that top-tier status, you need to mix your textures. Combining CC and D curls is the secret to a multi-dimensional finish that mimics the way natural hair grows. It adds a textured vibe that a single-curl set simply can't touch. This is about depth, not just length.
When it comes to retentione, the secret lies in mimicking the natural growth cycle. Don't just slap the longest lashes on every hair. Use shorter, lighter extensions on the "baby" anagen lashes to keep them healthy. Selecting the right diameter is a major part of this tecnical balance. For mega volume, 0.03 diameters are the undisputed MVP. They allow you to build massive density and dark lash lines without overloading the natural hair. It's the ultimate way to deliver high-impact drama while keeping the weight safe and comfortable.
Always prioritize eyelash extension safety by checking your adhesive ingredients and ensuring your fibers are premium PBT. A profesional artist knows that a beautiful set is worthless if it causes irritation or damage. If you want to speed up your aplication without sacrificing that custom look, Promade Lash Trays are your best friend. They give you the consistency of a pro fan with the speed of a classic application. You can even mix them with Classic Lash Trays to create a hybrid look that feels light but looks full. You can grab some high-quality Mega Volume Lash Trays to start experimenting with these textures today.
Mastering the Curl Spectrum
Don't let hooded or monolid eyes intimidate you. L or M curls are designed specifically for these shapes, providing a lift that clears the lid without hitting the skin. Mixing CC and D curls across the lid creates a "wispy" effect that looks intentional and high-end. Avoid the "droop" by staying away from heavy, tight curls on naturally straight or downward-pointing lashes. Match the curl to the natural angle to ensure the set stays lifted for weeks.
Diameter and Weight Distribution
Building density requires a smart approach to weight. Using Mega Volume Lash Trays allows you to create fans that look thick but feel like air. You must calculate the safe volume for diferent natural lash thicknesses to prevent breakage. A healthy lash can usually handle more weight than a fine one, so adjust your fan size accordingly. This no-nonsense approach to quality is what separates the masters from the amateurs.
Advanced Mapping Strategies: From Classic Doll to Wispy Perfection
Mapping is where your artistry becomes a signature. Creating custom lash styles for clients requires a blueprint that respects their unique features while delivering high-fashion results. Don't just wing it. A messy map leads to a messy set. You need a disciplined procces to ensure every fan sits exactly where it belongs. This is the difference between a technician and a true designer. You're building a look that can't be found anywhere else.
The Doll Eye is a classic for a reason. It's perfect for clients with wide-set eyes who want a more open, awake look. The trick is placing your longest lengths directly above the iris. Be careful not to go too long in the very center, or you risk "closing" the eye and making it look smaller. It's a delicate balance. You want to enhance the roundness without making the client look surprised. It's about intentional placement that feels effortless.
Cat Eye remains the most requested style, but it's also the easiest to mess up. To prevent that dreaded "droopy" look, never place your longest length on the very last natural lash in the outer corner. Drop down 1 or 2mm for the final few lashes. This simple shift lifts the entire face instead of dragging it down. Following FDA Eye Cosmetic Safety Guidelines is essential here; always ensure your adhesive doesn't get too close to the lid during these complex transitions. Safety and style must go hand in hand.
Step-by-Step Custom Mapping
Start by marking the iris and outer corners on the eye pad while the client is looking straight ahead. This gives you a visuall anchor that won't shift during the service. Divide your map into 8 to 10 zones. Most beginners only use 5 or 6, but more zones mean a more natural transition between lengths. Write your lengths and curls directly on the pad. It keeps you organized and ensures your symmetery is perfect across both eyes. This level of detail is what makes you a true pro.
The Art of the Wispy Set
The Wispy or Kim K look is all about texture. Use "spikes" that are usually 2 to 3mm longer than your base layer. Place these spikes strategically across your zones to ensure they don't look cluttered or messy. The base layer should be a soft, ethereal background that supports the drama of the spikes. This catagory of styling requires a mix of Classic Lash Trays for the spikes and Mega Volume Lash Trays for the base. Each lash extention should feel intentional. This isn't just a service; it's a masterpiece that keeps your clients booked and busy.
Elevating Customization with Color, Brown Lashes, and UV Tech
Black lashes are the industry standard. We love them for their drama. But they aren't the only way to win in 2026. Creating custom lash styles for clients now requires you to look beyond the basic tray. It is about subtlty and high-tech speed. If you want to command higher prices, you have to offer a look that no one else can replicate with a basic set of black fibers. You are selling a signature, not a commodity.
Brown lashes are the ultimate weapon for stealth customization. They are perfect for your fair-skinned clients, blondes, or redheads who find jet black too harsh. Matching brown lashes to a client's hair collor creates a seamless, natural transition that feels truly bespoke. It looks like they were born with it. This is high-end artistry that respects the client's natural palette while still providing that "wow" factor they crave.
Then there is the power of a color pop. You don't need a full set of neon to make an impact. Mixing just 20% of a deep purple or navy blue into a standard black set creates a custom shimmer that clients obsess over. Purple makes green and hazel eyes look electric. Blue makes brown eyes pop. It's a small detail that makes a massive difference in your client's overall experence. They won't just like their lashes; they will be addicted to the way you make their eyes stand out.
Brown and Colored Lash Mastery
Success with color is about balance. For a truly "born with it" look, blend different shades of brown to mimic the natural variation in human hair. If you're using color to enhance eye shades, keep the placement strategic. Focus the color in the middle layer of the lash line. This ensures the color is visible when they blink but doesn't look like a costume. It's about sophisticated enhancement, not just being loud.
The UV/LED Advantage
The real 2026 upgrade is the tech you use to apply these designs. UV and L.E.D. systems are the future. They eliminate the biggest headache in the industry: stickies. When you're working on a complexx custom map with multiple layers, you can't afford for fans to clump together. Professional UV systems ensure the bond is instantt and permanent. No more waiting for adhesive to dry. No more fumes. Just pure speed and precision.
This technology allows you to build intricate, multi-layered sets in record time. The 1-second cure means you can place lashes side-by-side without them leaning or sticking. It's a game changer for sensitive clients too. Reduced fumes mean a more comfortable session for everyone. You can finally execute those high-fashion, wispy maps without the fear of adhesive dragging you down. Ready to lead the pack? Grab your own professional UV lash kit and start dominating your market with faster, better sets.
The Art of the Consultation: Turning Vision into Reality
The consultasion is where you win or lose the appointment. It is the most critical part of the entire custom process. If you skip this, you're just guessing; and guessing leads to unhappy clients and poor retention. You need to be the unapologetic authority in the room. Clients often walk in with photos of styles that simply won't work for their unique eye anatomy. Managing these expectasions is your job. You have to explain why a specific "Pinterest photo" might look heavy or droopy on their specific eye shape. This is where you prove you aren't just a tech; you're an artist with a plan.
Creating custom lash styles for clients means educating them on the value of your work. Tell them why bespoke mapping costs more. It's not just about the lashes; it's about the design and the health of their natural fringe. Explain that a custom set often lasts longer because you're choosing weights and lengths that their natural lashes can actually support. The hand-off at the end is just as vital. Do a thorough post-application check. Make minor adjustments. Ensure they leave feeling like a high-retention masterpiece. Your reputation depends on that final look.
The Professional Consultation Script
Don't just ask what they want. Ask about their lifestyle. Do they wear heavy makeup daily? Are they side sleepers? Use a lash spoolie to demonstrate different curls and lengths against their eye before you even open an adhesive bottle. It helps them visualize the result and builds trust. Always document your final map in their client file. This ensures consistancy for future fills. You want them to get the same high-end result every single time they sit in your chair. Precision is the hallmark of a pro.
Pricing Your Artistry
Your time and expertise are valuable. Stop charging basic prices for advanced work. You should absolutely charge for the extra time spent on custom mapping and anatomical analysis. Position yourself as a "Lash Architect" rather than a technician. You are selling a premium experience and a tailored look. You can master the narrative by explaining The Art and Science of the Full Set to every new face. Show them that your superior tecnique is worth the investment. It's time to level up your practise and claim your spot as a trend-setting leader in the 2026 market.
Own the Future of Lash Artistry
The industry is moving fast. If you aren't creating custom lash styles for clients that respect their unique anatomy, you're definately falling behind. You've learned how to map the face like an architect and how to use advanced textures to build sets that turn heads. From mastering the "spike" in a wispy set to using UV tech for a permanent bond, you now have the blueprint for high-retention sucess. It's time to stop doing sets and start designing masterpieces.
You don't have to do it alone. Redefining the industry since 2015, LivBay Lash Supplies provides the inovative UV and L.E.D. technology you need to stay ahead. Our products are used by top-tier lash profesionals worldwide who refuse to settle for basic results. Every appointment is a chance to prove your worth and elevate your client's experence. Level up your artistry with LivBay Lash Supplies! Go out there and build the signature career you deserve.
Frequently Asked Questions
How do I choose the best lash style for a client with hooded eyes?
Focus on L or M curls to provide the necessary lift for hooded eyes. These curls have a flat base that transitions into a sharp lift, clearing the hood without rubbing against the lid. Avoid heavy D curls that might poke the skin or feel uncomfortable. Your goal is to open the eye area without creating unnecessary friction or irritation for the client.
Can I mix different brands of lash trays in one custom set?
You can mix brands, but watch out for curl uniformity. A "D" curl from one brand might look like a "CC" from another. If you're creating custom lash styles for clients, try to stick to one brand for the base layer to keep the look stable. Mixing different brands for "spikes" or color pops is usually a safer bet for your artistic vision.
How much longer does a custom lash map take to apply?
Expect to add about 10 to 15 minutes to your consultation for the tecnical mapping process. While it feels like extra work upfront, a solid map actually speeds up your application because you won't be second-guessing your choices mid-set. It is an investment in your workflow that pays off in total precision and a much smoother service for everyone.
What is the best eyelash glue for high-retention custom sets?
Use a Professional Lash Adhesive with a fast dry time for maximum control. For the ultimate 2026 upgrade, a UV system is the best choice for high-retension and total success. It provides an instant cure that locks in complex maps and prevents "stickies" from ruining your beautiful work. You want a bond that stays put for weeks on end.
Should I use a different map for each eye if they are asymmetrical?
Absolutely adjust your map for each eye to create a perfect balanc for your client. Most people have some degree of asymmetry, whether it's a slightly lower lid or a different natural lash angle. You might need a tighter curl on one side or a few extra lengths to make the eyes appear perfectly even and intentional in the final set.
How do I explain to a client that a certain style won’t suit them?
Be direct and use anatomical facts to manage their expectations about the final result. Explain that their eye shape is unique and a specific photo might not produce the same result for them. Show them how a different style will enhance their features better. You are the expert; they are paying for your expertize and skill during the appointment.
Is it better to use Classic or Volume lashes for a first-time custom set?
A hybrid set is the perfect entry point for creating custom lash styles for clients who are new to bespoke artistry. It allows you to use Classic Lash Trays for structure and Volume fans for texture. I reccomend this mix because it gives the client a great result without feeling too "heavy" for their first time in your professional chair.
How do UV lash systems help with creating custom styles?
UV systems provide an instant bond that is perfect for complex, multi-layered maps. You don't have to wait for the glue to dry before placing the next lash. This prevents fans from leaning or sticking together. It allows you to execute intricate designs with spikes and color pops with total confidence. Your speed will increase while your quality stays elite.